Skip to content

Category: Servers

Unraid – Unmountable: Volume not encrypted

So I got this error on my Unraid server for a drive, “Unmountable: Volume not encrypted” for a drive I had used on another server. There was nothing on the drive I wanted so I just wanted to overwrite or format it.

Finally found a link to just overwrite the filesystem.

https://unix.stackexchange.com/questions/315063/mount-wrong-fs-type-bad-option-bad-superblock

mkfs.ext4 /dev/sXXX

Leave a Comment

All of my RAM is not showing up in Unraid

So I bought some RAM recently in one of those bins on clearance because it was opened, etc. I installed it with another two sticks I already had. All four sticks are DDR4, of course, but the old ones were 2x8GB 26666, and the new ones are 2×16 GB 3200. Unraid would only show 16GB usable rather than the 48GB. Unraid did notice them, but they were unable to be used.

After some googling which didn’t get me anywhere, I decided to remove all the sticks and just use the new ones in A2 and B2. Well, now Unraid shows 32GB of RAM usable. So next, I put in the other two sticks in A1 and B1. Boom!!! Now it can use all 48GB. I assume it has to do with a mismatch in either speed or capacity.

Motherboard: Asrock B450M Pro4

Leave a Comment

traefik v3 example with uptime-kuma

Here is an example of Traefik, using Uptime-Kuma as an example with a domain for it plus using letsencrypt to secure the domain. We also redirect HTTP to HTTPS.

The Traefik dashboard is not secure, so please implement security or a firewall.

This is just an example.

version: "3"

services:
 uk1:
    image: louislam/uptime-kuma:1
    container_name: uk1
    volumes:
      - ./uk1-data:/app/data
    ports:
      - 3001:3001  # <Host Port>:<Container Port>
    restart: always
    labels:
      - "traefik.enable=true"
      - "traefik.http.routers.uk1.tls.certresolver=myresolver"
      - "traefik.http.routers.uk1-http.entrypoints=web"
      - "traefik.http.routers.uk1-http.rule=Host(`your_domain_here`)"
      - "traefik.http.routers.uk1-http.middlewares=uk1-https"
      - "traefik.http.middlewares.uk1-https.redirectscheme.scheme=https"
      - "traefik.http.routers.uk1.entrypoints=websecure"
      - "traefik.http.routers.uk1.rule=Host(`your_domain_here`)"
      - "traefik.http.routers.uk1.tls=true"
    depends_on:
      - traefik
 traefik:
  image: traefik:v3.0
  command:
      - "--api.insecure=true"
      - "--providers.docker=true"
      - "--providers.docker.exposedbydefault=false"
      - "--entrypoints.web.address=:80"
      - "--entrypoints.websecure.address=:443"
      - "--certificatesresolvers.myresolver.acme.httpchallenge=true"
      - "--certificatesresolvers.myresolver.acme.httpchallenge.entrypoint=web"
      - "--certificatesresolvers.myresolver.acme.email=your_email_address_here"
      - "--certificatesresolvers.myresolver.acme.storage=/letsencrypt/acme.json"
  ports:
    - 80:80
    - 443:443
    - 8080:8080
  volumes:
    - "./letsencrypt:/letsencrypt"
    - /var/run/docker.sock:/var/run/docker.sock

https://gist.github.com/xavier-hernandez/48042d5cdb66a89ac5e92a92ecfeb7b5

Leave a Comment

Install dotnet core on Ubuntu 22.04

These are the steps I used to install dotnet core on Ubuntu 22.04, both the SDK and the runtime.

apt update
apt install -y apt-transport-https
wget https://packages.microsoft.com/config/ubuntu/22.04/packages-microsoft-prod.deb -O packages-microsoft-prod.deb
dpkg -i packages-microsoft-prod.deb
rm packages-microsoft-prod.deb
apt update
apt install -y dotnet-sdk-7.0
apt update
apt install -y aspnetcore-runtime-7.0

To verify installation run the following commands. If the below doesn’t work try to open a new ssh session or terminal.

dotnet --list-runtimes

Microsoft.AspNetCore.App 7.0.2 [/usr/share/dotnet/shared/Microsoft.AspNetCore.App]
Microsoft.NETCore.App 7.0.2 [/usr/share/dotnet/shared/Microsoft.NETCore.App]

dotnet --list-sdks

7.0.102 [/usr/share/dotnet/sdk]
root@srv4311:~# 

If you tried previously to install version 7.0 make sure you remove/purge the old version from the system. Something like below.

apt remove --purge dotnet-sdk-6.0 dotnet-runtime-6.0
apt auto-remove

Also maybe delete the .dotnet folder in your home directory.

Leave a Comment

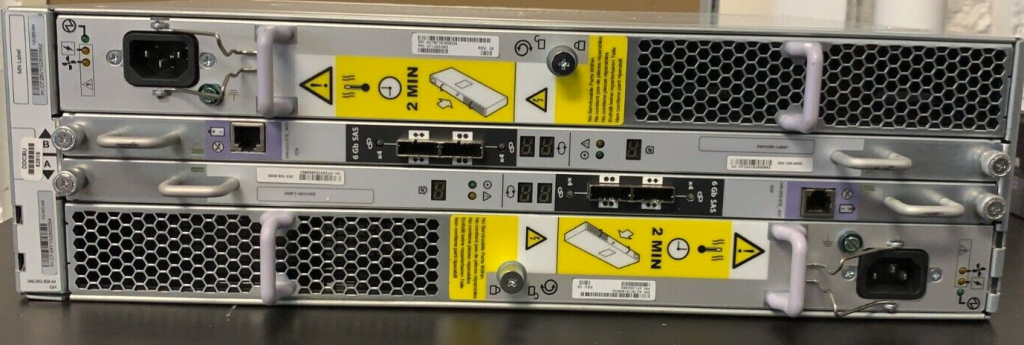
Unraid Upgrade – EMC KTNSTL3

I recently updated my Unraid to use an EMC KTNSTL3 storage array. I use a lot of small drives which are really cheap.

So far it’s working great. Bought it on eBay.

https://www.ebay.com/itm/284306911248

I’m using SATA drives so you need to buy the Interposers. They turn your SATA into SAS drives so they fit in the caddy.

You’ll need 15 of them otherwise you can use straight SAS drives.

There does appear to be one quirk you need to know. Only one set of the SAS controllers reads SATA drives. I think it’s the bottom one so hook up your mini SAS cables there.

Also, I had some 14TB drives that I just installed and they kept giving me an “unsupported partition layout”. To fix this I just had to reboot the Unraid box. I’m not sure why but it worked after that.

You’ll also need a SAS card as well. I have the LSI 9200-8e. Something like the pic below. You can buy them on eBay too. I like this seller https://www.ebay.com/str/theartofserver .

There was some useful information below however it related to TrueNAS.

Leave a Comment

GoAccess for Nginx Proxy Manager Logs

This docker container should work out of the box with Nginx Proxy Manager to parse proxy logs. The goaccess.conf has been configured to only access proxy logs and archived proxy logs. No fuss, no muss.

The docker image scans and includes files matching the following criteria: proxy-host-*_access.log.gz proxy-host-*_access.log

Currently using GoAccess version: 1.5.5

Unraid container is also available.

https://hub.docker.com/r/xavierh/goaccess-for-nginxproxymanager

Leave a Comment

Setting up Rocket.Chat with Mongo 4.2 via Docker

I could not find a docker-compose.yml example with rocket.chat using 4.2 so I pieced one together.

Also, some tips on these errors.

Error: $MONGO_OPLOG_URL must be set to the ‘local’ database of a Mongo replica set

MongoError: not master and slaveOk=false

Visit my Github repo for more information: https://github.com/xavier-hernandez/rocket.chat/

Leave a Comment

Adding Unraid Mount Share via Tag to FSTAB

Create a share on the VM machine itself in Unraid.

Screenshot of Unraid Share and Unraid Mount tag example.

Let’s assume your mount tag is “test”.

Make sure you create your mount folder within the VM. In our case its “/whatever”. Modify your /etc/fstab file like this to mount the share. Then reboot.

test  /whatever 9p trans=virtio,version=9p2000.L,_netdev,rw 0 0
Leave a Comment

Network stopped working in Ubuntu 18.04

I had a Ubuntu VM that lost its ability to get an IP. I have no idea why but I finally found the issue and it seems that the interface name changed.

Maybe its a bug : https://bugs.launchpad.net/ubuntu/+source/netplan.io/+bug/1881832

So I found out that the network interface that was trying to do DHCP did not exist. You’ll find this in /etc/netplan/50-cloud-init.yaml . For some reason, it showed that my interface was enp1s0 but it wasn’t, it was enp3s0. So I modified the file and rebooted the server. Everything is fine now.

Leave a Comment

UnRaid Expanding qcow2 drive, Windows 10

To expand your drive size in UnRaid.

  • Go to VMs
  • Click on the name of the VM you want to expand
  • A new bar will appear, disk devices. Click on the capacity.
  • Set a new size and hit enter.
  • Start the machine, log in, etc.
  • Go to administrative tools, computer management, storage, disk management
  • Right click “disk management” and hit refresh
  • You should now see the additional space
  • Expand your disk
  • Done
Leave a Comment

Duplicati on Ubuntu 16.04 – Headless

Install Mono
https://www.mono-project.com/download/stable/#download-lin-ubuntu

sudo apt-key adv –keyserver hkp://keyserver.ubuntu.com:80 –recv-keys 3FA7E0328081BFF6A14DA29AA6A19B38D3D831EF
sudo apt install apt-transport-https ca-certificates
echo “deb https://download.mono-project.com/repo/ubuntu stable-xenial main” | sudo tee /etc/apt/sources.list.d/mono-official-stable.list
sudo apt update

sudo apt install mono-devel

Install Duplicati
wget https://updates.duplicati.com/beta/duplicati_2.0.5.1-1_all.deb
apt install ./duplicati_2.0.5.1-1_all.deb

To Test
duplicati-server –webservice-interface=any –webservice-port=8200 –webservice-allowed-hostnames=*

Modify the following file, /etc/default/duplicati, to allow access for any IP
DAEMON_OPTS=”–webservice-interface=any –webservice-port=8200 –webservice-allowed-hostnames=*”

Add the following as /etc/systemd/system/duplicati.service
[Unit]
Description=Duplicati web-server
After=network.target

[Service]
EnvironmentFile=-/etc/default/duplicati
ExecStart=/usr/bin/duplicati-server $DAEMON_OPTS

[Install]
WantedBy=multi-user.target

To enable duplicati
systemctl enable duplicati

Check if the service is now running
systemctl status duplicati.service

If its not, try the following then check the status again
systemctl start duplicati.service

Leave a Comment

Pi-hole static DNS entry

This is more docker related but should be similar to just a plain jane install. You can add your static entries to the /etc/hosts file or you can add it the the dnsmasq.d configuration file.

Create a file under /etc/dnsmasq.d, something like myhosts.conf and add the following. Keep adding entries until your done.

host-record=hostname.com,192.168.1.1

Find your pi-hole dns configuration under /etc/dnsmasq.d. Open the file and add the following line to end of your the configuration file.

conf-file= /etc/dnsmasq.d/ myhosts .conf

Go back to the pi-hole GUI and restart the DNS under settings/system “restart DNS resolver”.

Leave a Comment

UNRAID – Increase Storage for Windows 10 VM

  1. Go to your UNRAID GUI
  2. Click on VMs
  3. Make sure the VM you want to make the modifications to is stopped
  4. Click the Name of the VM
  5. Disk devices should display
  6. Under capacity there should be links to the drive you want to add space too, click that link and enter the new capacity. Hit Enter.
  7. Start the VM
  8. Now reboot the VM (this is necessary for it to find the new space available – not sure why)
  9. Log in to your Windows VM
  10. Open Computer Management
  11. Go to Disk Management
  12. You can now expand the partition to its capacity
Leave a Comment

Unraid 6.7 – Backing up VMs (KVM)

This is short summary of Spaceinvader One’s video and a little more up to date. https://www.youtube.com/watch?v=ntjQphOSPPI

  1. Install Community Applications, if not already installed
    1. Forum with more information –
      https://forums.unraid.net/topic/38582-plug-in-community-applications/
    2. Direct Link to the plugin – https://raw.githubusercontent.com/Squidly271/community.applications/master/plugins/community.applications.plg
  2. Install CA User Scripts from Community Applications
  3. After its installed, click Settings in the top nav bar of UNRAID
  4. Go down to User Utilities, click on User Scripts
  5. Click Add New Script
  6. Call the script whatever you want, i.e. “Backup VMs”. Click ok.
  7. Click the title of the script you just added, you should see a popup.
  8. Edit Description if you’d like
  9. Click Edit Script and paste everything from this page
    https://raw.githubusercontent.com/danioj/unraid-autovmbackup/master/unraid-autovmbackup-0-4.sh to that window
  10. Follow the instructions in the file or in the video to set up the script

I’m using UNRAID 6.7.0, CA User Scripts 2019.06.16

Leave a Comment